When I was first married, there were no satnavs to hold our hands; we relied on maps (if there was one handy) or trial and error. Whenever my husband wasn’t sure whether to go left or right he would ask me. ‘Left,’ I might say. He immediately turned right — and he was never wrong. I sometimes think of this when I am defending. In the two or three-card ending, if there is a choice I can be relied upon to do the wrong thing. So much so that I have tried doing the opposite of my instinct and, humiliatingly, it worked. Well, not so humiliating actually, as my partner doesn’t know my thinking process — just sighs with relief that another contract has not been let through.
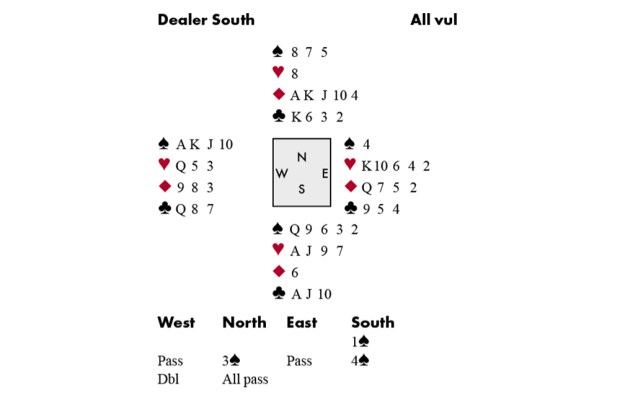
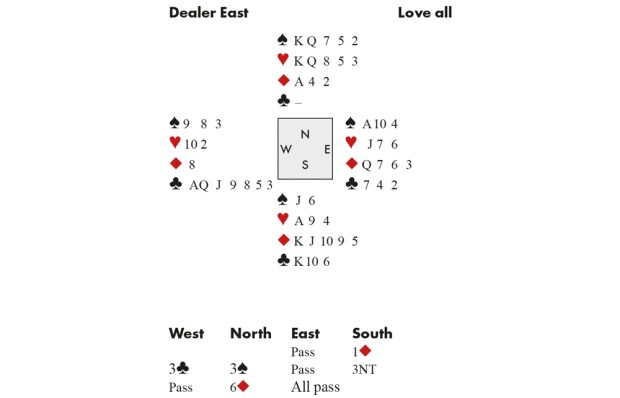
I was given today’s hand by the late Martin Hoffman. It is a brilliant combination of safety play and control: if you get greedy or sloppy you go off.
West naturally led 2♥, which Declarer ruffed in dummy and cashed the two top clubs, discarding hearts from his hand. A third club was ruffed with ♠A, which, we can all see, promoted West’s ♠J. Next came a spade to the Queen followed by a winning club discarding his last heart, thereby stopping West forcing dummy with another heart when he ruffs. Whichever red suit West returns, Declarer wins in hand, draws the outstanding trump and claims. South made two great plays to secure his contract: ruffing with the ♠A and discarding his last heart on the good club. No wrong turnings there.
Got something to add? Join the discussion and comment below.
Get 10 issues for just $10
Subscribe to The Spectator Australia today for the next 10 magazine issues, plus full online access, for just $10.
You might disagree with half of it, but you’ll enjoy reading all of it. Try your first month for free, then just $2 a week for the remainder of your first year.


Comments
Don't miss out
Join the conversation with other Spectator Australia readers. Subscribe to leave a comment.
SUBSCRIBEAlready a subscriber? Log in