In 1972, in collaboration with George Botterill, two-times British champion, I published a revolutionary book on 1 … g6 which we named the Modern Defence. At first sight this defence is paradoxical, since it makes no attempt whatsoever to prevent the construction of a gigantic white pawn structure. However, its virtues have subsequently been recognised and it is now mainstream, as this week’s win by the world champion demonstrates. First Steps: The Modern by Cyrus Lakdawala is published by Everyman Chess.
Wei Yi-Carlsen: Bilbao 2016; Modern Defence
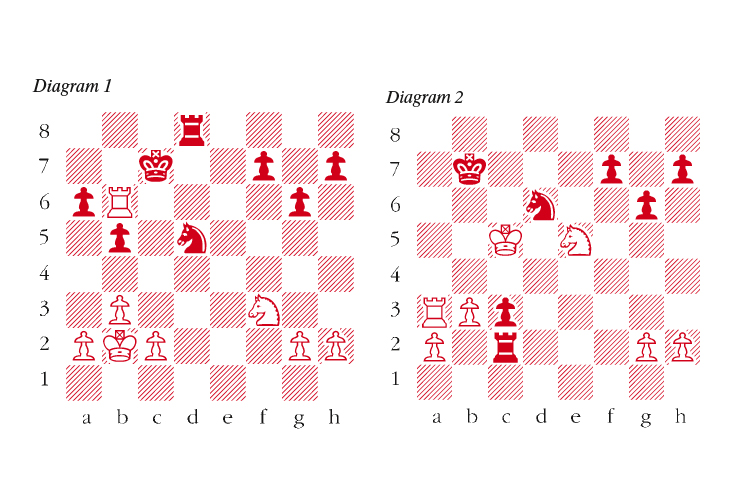
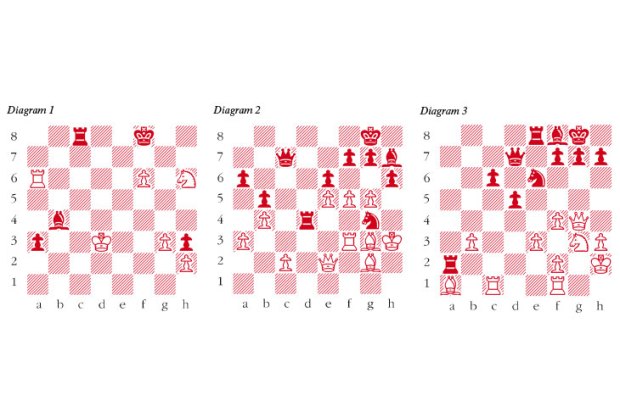
1 d4 g6 2 e4 Bg7 3 Nc3 d6 4 Be3 a6 5 f4 b5 6 Nf3 Nd7 7 e5 Bb7 8 Bd3 c5 The dismantling of White’s centre is top priority. 9 Be4 Bxe4 10 Nxe4 Nh6 11 dxc5 dxe5 12 c6 Nf6 13 Qxd8+ Rxd8 14 Nxf6+ exf6 15 c7 Rc8 16 Bb6 This is scary for Black, since now White plans to transfer a rook to d8. 16 … Kd7 Carlsen utilises the endgame principle which guides us to move our king out of the safety zone and put it to work in an ending. In fact in this game Carlsen’s hardworking king moved a remarkable total of 11 times. 17 Ba5 Nf5 18 0-0-0+ Kc6 19 Rd8 Carlsen now finds an efficient way to dismantle White’s bind by transferring the knight to either c4 or b7, which dislodges White’s bishop. 19 … Nd6 20 fxe5 fxe5 21 Rd1 Nc4 22 Bc3 Rxc7 23 b3 Ne3 24 Bxe5 Nxd1 25 Rd6+ The endgame is approximately even. 25 … Kb7 26 Bxg7 Rg8 27 Bd4 Nc3 Black has won the exchange, but White now wins it back. 28 Rb6+ Kc8 29 Be5 Rd8 30 Kb2 Nd5 31 Bxc7 Kxc7 (see diagram 1) Brilliant judgment. Carlsen sees that White’s future awkward rook’s position on a6 more than makes up for Black being down a pawn. 31 … Nxc7 32 Rf6 places Black on the defensive. 32 Rxa6 Kb7 33 Ra3 Ne3 34 c4 bxc4 35 Ne5 White goes astray. Correct was 35 b4! Nxg2 36 Ne5 when the position remains tense and approximately balanced. 35 … Rd2+ 36 Kc3 Rc2+ 37 Kd4 Nf5+ 38 Kd5 c3 White’s pieces are oddly out of synch, when it comes to halting the surging c-pawn. 39 Kc5 Nd6 (see diagram 2) Carlsen offers a knight, which can’t be touched as after 40 Kxd6?? Rd2+ 41 Ke7 c2 nothing can stop promotion. 40 Nc6 Ne4+ 41 Kb5 White is hoping to generate counter-play with mating threats. 41 … Kc7 41 … Rxg2?? walks into 42 Ra7+ Kc8 43 Kb6 c2 44 Rc7 mate. 42 Ra7+ Kd6 43 Ra4 f5 44 Kb6 Rxg2 45 Rd4+ Ke6 46 a4 Ra2 47 a5 Rb2 48 Kc7 Nc5 49 Rc4 Na6+ 50 Kb6 Rxb3+ 51 Kxa6 Kd5 52 Rb4 A clever try, but not good enough. After 52 Ne5 Kxe5 Black wins easily, since his pawn can promote, while White’s can’t. 52 … c2 Black will win the queen versus rook and knight ending. 53 Ne7+ Kc5 54 Rxb3 c1Q 55 Rb6 Qc4+ 56 Kb7 Qe4+ 57 Nc6 Qd5 58 Kc7 Qd6+ 59 Kb7 Qd7+ 60 Kb8 f4 White resigns
Got something to add? Join the discussion and comment below.
Get 10 issues for just $10
Subscribe to The Spectator Australia today for the next 10 magazine issues, plus full online access, for just $10.
You might disagree with half of it, but you’ll enjoy reading all of it. Try your first month for free, then just $2 a week for the remainder of your first year.


Comments
Don't miss out
Join the conversation with other Spectator Australia readers. Subscribe to leave a comment.
SUBSCRIBEAlready a subscriber? Log in